Posted on

Introducing LongMill MK2 Beginners Kit

The LongMill MK2 Beginner’s Kit is a, “everything you need to get started with CNCing” package. This package comes with the LongMill MK2 CNC machine and basic accessories that the large majority of users order. Not only does this help new users get everything they need to start, but also reduces lead times as it allows us to make pre-assembled kits in stock.

What is the LongMill MK2 Beginners Kit?

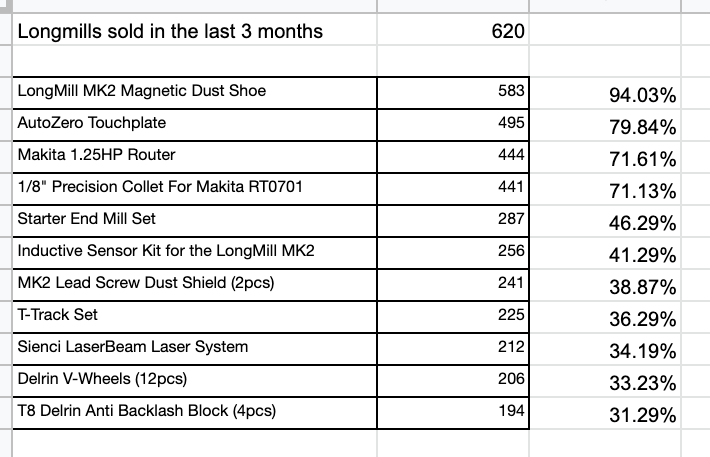
We created the LongMill Beginner’s Kit based on sales data for items that customers buy with their LongMill, as well as feedback from our customer service team on items we felt were most beneficial for customers to have when opening their boxes.

The Beginner Kit comes fully loaded with:

1 x LongMill Benchtop CNC MK2 – choose between 30×30 or 48×30

1 x AutoZero Touch Plate

1 x Starter End Mill Set

1 x LongMill MK2 Magnetic Dust Shoe

1 x Makita RT0701C Router

It should be noted that all of the items can be purchased separately, customers who wish to pick and choose what they get with their order can still do so through our Store.

It’s also important for us to mention that there are also certain items that we feel like although a lot of people buy them, they are either not needed for beginners or don’t bring a lot of value.

For example, let’s take the MK2 Lead Screw Dust Shield. For regular use, they are not needed at all. Since the lead screws and nuts on the LongMill are designed to be used in dusty environments, they do not need to be covered. In fact, they can be inconvenient in ways as they need to be removed every time the nuts have to be adjusted.

The other big omission folks might notice is the Inductive Sensor Kit for the LongMill MK2. This is because we believe that most beginners will find them unnecessary, and due to the complexity of setting them up, we find a lot of customers have issues due to improper setup and settings. Additionally, since crashing the LongMill won’t damage the machine, using limit sensors are not needed for limiting travel. All in all, we feel that for most people, they will be more trouble than they are worth. We recommend adding them once customers are familiar with using their machine and are ready to take the next step in doing more advanced work.

You might also have noticed that the 1/8″ Precision Collet for the Makita RT0701 also isn’t included in the list. That’s because the Starter End Mill Set comes with a 1/4″ to 1/8″ Collet Adapter included.

The items in the Beginner’s Package are there because we think they are the products we think you should get to have the best experience as a beginner. We don’t want to sell you stuff you probably won’t need, especially when starting out. However, if you want those items, feel free to add them to your cart, we won’t stop you!

Why does the Beginners Kit exist?

We decided to create the Beginners Kit as we believe it will streamline many of the processes at Sienci Labs and in the ordering for the customer.

One major thing we’re trying to work on, especially in the busy times of the year is keeping up with demand. Most customers will have experienced some sort of wait time for their machines. We’ve identified that if we can build the same group of kits with the same items over and over again, rather than customizing the kit for every customer, we can save a lot of time and money. 

We also found that customers were getting confused with what to order with their machines when first starting out, which meant that in some cases, they would need to make more than one order to get everything they want. In fact, one of the most common questions we get is, “What do I need to get with our machine?”

Additionally, by pre-packing machines, we can stockpile them during slow seasons and ship kits more quickly. This helps keep our packing team busy, better prepared for shifts in sales during the season, and allows us to ship machines significantly faster than before. And at some point, if this works really well, we can also start setting up distribution in the US and other parts of the world with pre-kitted machines so that we can save on shipping costs overall as well.

Another part of this move is also with regards to managing customs, as we found with certain orders with a lot of line items in the customs documentation were prone to being held up and there being more issues overall. We believe that by streamlining the machine kit into fewer line items, we can help clear customs more easily. 

Also, now that the pandemic is basically over, we’ve been getting a lot more people coming in directly to the shop to purchase machines and we’re planning on going to some shows and events, and we’ll be able to take some machines to sell directly!

So rather than having things set up so that customers have to pick and choose every single item, we bundle everything they need to get set up with their machine based on what the average person orders with their machine.

How does the Beginners Kit work?

Interested in ordering a LongMill MK2 Beginners Kit? Here’s what you can do!

  • Choose the version of the LongMill MK2 Beginners Kit you want and put it in your cart
  • If you want to order anything else at the same time, feel free to include it in your order.
    • IMPORTANT: Your order may ship together or in two separate packages. You will receive tracking info once your order ships and either one or two tracking numbers.
  • You should have your shipped out within the next business day. Most transit times when with courier within North America is 3-5 days, but could take up to 2 weeks.

Beginners Kit Discount

We are currently offering roughly a $100CAD discount on Beginners Kits.

Here’s why:

  • We are moving in October and we want to clear out as much inventory as possible
  • Since we’re expecting some cost savings in streamlining the packing and shipping process, we are passing along these savings to you!
  • This is also an experiment to see if the Beginners Kit will be a potential staple product for us in the long run.

This offer will be available until:

  • We run low in stock
  • We can’t keep up with the sales
  • We realize the beginners kit wasn’t a great idea after all…

But otherwise……………..

Posted on

August 18 – August 25, 2023 “A Project That is a Sign” Contest

So many beautiful tribute projects! Thanks to everyone who entered this week’s contest, where we asked you all to post your lovely tribute projects made on the LongMill. 


We are happy to announce that Dallas Forbes, Don Rideout, Créations Namily, Dave Parkerson, Peter Labonte, and Rick Gauthier are the winners of the “A Project That is a Tribute” contest! A prize is on its way!


This Week’s Theme: A Project That is a Sign

This week’s theme is “projects that are signs”. Post your most creative sign projects that were made using your LongMill and share them with us for a chance to be one of the winners of this week’s contest and win free prizes!

Have ideas for themes? Let us know by commenting down below!

Happy building!

Posted on

Everything you need to know about the spring-loaded anti-backlash nut

Hi everyone, I’m excited to share a small development, the Spring Loaded Anti-Backlash Nut! As we’ve continued to have LongMills out in the wild, we’ve recognized that the finickiness of the Delrin Anti-Backlash Nut was a pain point for our users, such as the need for adjustment on a regular basis, the potential for the adjustment screw to fall out, and improper tensioning causing jamming, especially at higher speeds.

The Spring Loaded Anti-Backlash Nut is designed to address these issues by using a set of springs to tension the nut against the threads radially, allowing smoother operation and no adjustment needed from the operator. We are now putting this out into the wild for field testing!

These nuts are drop-in replacements for any T8 size Delrin nut on the MK1 or MK2 LongMill.

Assembled Spring Loaded Nut

This new version is now available on sale and ready to ship in our store.

Flaws with the current Delrin Anti-Backlash Nut

For those who don’t know, the Delrin Anti-Backlash Nut design comes from the original Openbuilds Anti-Backlash Nut Block. At the time, this was more or less the best option for this type of hobby CNCing for T8 lead screws because it’s:

  • Inexpensive
  • Simple
  • Easy to manufacture
  • Easy to integrate
  • Low maintenance
  • Generally works pretty well

Since we were still in the early stages and didn’t have the manufacturing volume and capability to make our own designs at scale, we stuck to a lot of open-source and off-the-shelf components. As some users may have noticed, we’ve slowly been working on different innovations to improve and redevelop our own components to work better and more reliably.

The original design comes with a couple of flaws:

  • Requires constant adjustment to reduce backlash
  • Over-adjustment or incorrect assembly results in binding
  • Inconsistent resistance during its life cycle

To improve on this design, I worked on some different concepts using springs to pre-load the nuts, finally resulting in this shape:

“This design incorporates OpenBuilds, LLC design work(s) shared Open Source under the CC BY-SA 4.0 License.”  

In this design, we use two springs in the gaps to apply radial preload on the lead screw threads. This allows the two “arms” to push into the threads as it wears, automatically reducing the backlash.

According to Helix Linear, another manufacturer for anti-backlash nuts, “the radial anti-backlash nut can handle loads greater than the spring force. There is also less of an increase in required drive torque compared to an axial anti-backlash nut.”

In this design, we use two arms instead of three typically used in industrial nuts, to keep the same form factor, so that the new nut can drop in to replace the current version with no modification.

Other benefits include:

  • Zero adjustments or maintenance after installation
  • Lower potential for binding
  • Smoother, lower resistance operation

Next steps

We’ve done some initial testing with 3D-printed nylon nuts, which have pretty good results, showing basically no backlash over testing. We’ve now ordered 400pcs (100 sets) of machined Delrin nuts. Our goal is to put them available for sale for people to use on their own machines. If they work well in the field we will switch to spring-loaded nuts as the default standard in LongMill kits.

I should include a disclaimer, which is that these are still a new, unproven product, and it is still possible that in the long term they may perform worse than the original nut.

We want to put these nuts out in the field so that we can get feedback and long-term testing done to validate the design. I’m very confident that this will make an improvement to the overall experience of using the LongMill, but before we make the switch, we want to make sure that we do some real-life testing.

There may be some small tweaks we may consider making, such as adjusting the spring force and length and spacing of the arms, which may happen based on the beta testing.

For this first batch of nuts, we will collect some survey data to help understand the experience of the user. At this current stage, we only have T8-size nuts, but we may expand it to the T12 size as well.

Posted on

August 11 – August 18, 2023 “A Project That is a Tribute” Contest

Happy Friday everyone! Thank you to the makers who participated in this week’s contest, where we asked you all to post your toy masterpieces made on the LongMill.


Last Week’s Winners

We are happy to announce that Michael Anthony Mascaro, George Morris, Matt Osterhaus, Ken Maddle, Pierre Gauthier, and Roger Jo are the winners of the “A Project That is a Toy” contest! Watch out for a prize coming your way!


This Week’s Theme: A Project That is a Tribute

The theme for this week is “projects that are tributes”. Share with us the beautiful tribute projects that you made on your LongMill. We will choose our favourite ones and send creators some awesome prizes.

Have ideas for themes? Let us know by commenting down below!

Happy creating!

Posted on

Vortex Rotary Axis is now shipping!

Congratulations to everyone at Sienci Labs, we have completed packing the first few Vortex Rotary Axis Kits which are now awaiting shipping or pickup! For more information about the Vortex, please visit our blog here: https://sienci-upgrade.cospark.io/2023/05/08/vortex-rotary-axis-launch-date-june-1-2023/

At the time of writing, the resources now include instructions on assembly and set up, as well as set up and software basics. We even have a guide on making your first project.

We’re super excited to get all of the pre-orders out to customers in the next few weeks! We are planning to ship around 40-50 per week until we are completed the queue.

Still thinking about getting a Rotary Axis? We still have some in stock, to order, visit the product page here: https://sienci-upgrade.cospark.io/product/vortex-rotary-axis/

Our first excited customer
First few Vortex Rotary Axis packed
Assembly of bearings and shaft
Test assembly of the Vortex
Posted on

August 4 – August 11, 2023 “A Project That is a Toy” Contest

Weekly themed contest time! Thanks to everyone who entered the contest for this week, where we asked you all to share your most difficult projects made on the LongMill.


Last Week’s Winners

We are happy to announce that Daniel Kerr, Bill Iverson, Emmanuel Mercado, Ian Doucette, Scott Cressman, and Ian Fraser are the winners of the “Your Most Difficult Project” contest! A prize is on the way!


This Week’s Theme: A Project That is a Toy

This week’s theme is “projects that are toys”! Post your dollhouses, trains, cars, figurines, wooden toys, or any toys you made on your LongMill, and we’ll choose our favorite ones to send cool stuff for free.

Have ideas for themes? Let us know by commenting down below!

Happy crafting!

Posted on

Everything you need to get to for starting CNCing with your LongMill

One of the most common questions we get from folks looking to order a LongMill is “What should I get with it?”. This article and video are designed to help you walk through everything you need.

The average order value for customers first purchasing a LongMill and accessories in the past 12 months is approximately $2850CAD or $2190USD, which means that for most customers, you can easily get a complete setup for under $3000. These numbers represent the total value of the order, which includes the machine, as well as most other accessories such as the software, router, endmills, a dust shoe, touch plate, and other items. You should allocate a few hundred dollars for other items that you may or may not have in your shop already, such as a bench, computer, and vacuum.

Here is the breakdown of the most popular items that customers order along with their LongMill by percentage.

The LongMill

If it’s your first time getting into hobby CNC, you might be a little intimidated by what you need to get started. This video is designed to cover everything you need to have in your shop.

Your first, and largest purchase is going to be the machine itself. The LongMill Benchtop CNC is a capable option for hobbyists who are looking for a lot of functionality found on more expensive machines but in a more budget-friendly package. Depending on the size, you can get a LongMill for around $1800 to $2300CAD or around $1400USD to $2000USD, which makes it one of the least expensive options for the size.

While there are cheaper and more expensive machine options out there, we believe our specific machine is best suited for customers who:

  • Are looking to do this as a hobby, with some interest in production and business work
  • Need high-quality resources and support
  • Willing to make a small compromise in cutting speed but still be able to produce the same type of work as more expensive machines

Our main goal as a company is to make CNC accessible to everyone. This comes down to a number of commitments to our customers and products:

  • To make products that are affordable for the average hobbyist
  • Provide resources, support, and instructions so that we can make sure our customers can be successful in using our products.

We feel that customers not only choose the LongMill because it is an affordable option, but because we created a helpful and supportive community around our products.

If you’re not sure what size to choose, we recommend considering the working areas of each version of the machine, and determining what size fits in your shop as well as can do the type of projects that you’re interested in doing.

Router or Spindle

The base LongMill kit does not come with a router, since we wanted to let customers choose which router they want to use with their machine. The LongMill can work with several different palm routers, but the one that is the most popular and the one we recommend is the Makita RT0701, as it’s inexpensive, readily available, and has more than enough power for general woodworking use. You can order this directly through us, or at most local hardware stores.

The LongMill also can be retrofitted with an aftermarket spindle, and we provide 71 and 80mm router mounts for larger spindles, however, due to cost and complexity, we only recommend this upgrade to experienced customers. More information about routers and spindles can be found in our resources.

End Mills and Bits

You’ll also need to get some end mills and bits to start off your CNCing journey.

Assuming you have a Makita router, you’ll mostly be using ¼” shank tools, or if you get either the ¼” to ⅛” adapter, or the ⅛” Precision Collet, ⅛” shank tooling as well.

We provide dozens of different bit options and packs on our store. If you’re not sure what to get, we recommend checking out one of the End Mill Sets, such as the Signmakers Set and Machinist Set.

If you’re starting out for the first time, I recommend the Starter End Mill Set, which comes with all of the bits that we think you’ll need and a collet adapter. The Starter End Mill set, which we recommend for first-time users, is about $45USD or $60CAD, and come with 9 different bits and accessories.

Prices for bits vary a lot, especially when you get into high-end tools, but for the average user, you should expect to pay a few dollars for smaller tooling, and up to around 20 dollars for a larger bit.

Bench

The last thing you must get for your CNC is a bench and spoiboard. This is just a large surface you can put your machine on. It should be noted that the surface should be as flat and strong as possible, since any flex or irregularity may show up in your cuts as well. Some people will make a bench from scratch, which can cost $100s of dollars, but even an old sturdy desk or dining room table can work as well.

Some different ideas and inspirations can be found in our resources.

You’ll also need a spoil board or wasteboard, which acts as a consumable surface for your projects to sit on. We recommend ¾” MDF, as its cheap, readily available, and dimensionally stable. You should be able to buy a 4×8 sheet and cut it into 2-3 wasteboards for about $60.

Computer and Software

There are two main pieces of software you’ll need with your CNC machine. First is the gcode sender. We build gSender as a feature-filled, powerful sender specifically for the LongMill. This program lets you send jobs, change settings, control your machine, and integrate with accessories like the touch plate and inductive sensors. Best of all, it’s completely free!

There are other gcode sending software, such as UGS and Openbuilds Control, but we think you should use gSender.

I recommend checking out our resources where we talk about different CNC software (Broll of scrolling through the resources, https://resources.sienci.com/view/lmk2-choosing-software/ or checking out our video on software to help you choose which software to get.

If you want to read about our thoughts on Free vs Paid software, we recommend reading our article on the topic.

Dust Collection

CNCing can be really messy, which makes dust collection an important part of your setup. 

At our shop, we use a Rigid Shop Vac and Dust Deputy, both of which can be purchased for about $200. This sort of set up will be more than capable for hobby CNC dust collection use.

To help clean up dust while cutting, we have the Dust Shoe, a $60USD, $75CAD attachment which goes on the front of the machine to suck up dust while your job is cutting. This particular one works with the 2.5in hose from the Rigid Vac perfectly.

Work Holding

To keep parts from flying out while cutting, you’ll need some form of work holding. Certain methods, such as using screws or hot glue, are very inexpensive and are easy to use. 

Some users will set up a t-track table on their wasteboard which allows you to use t-clamps and ¼” bolts to have a fast and adjustable system for workholding. A full set costs about $100USD or $125CAD.

I should note what makes our t-tracks unique is that they use ¼”-20 bolts rather than t-bolts which are harder to find, so that you can buy different size bolts from the hardware store if you want to make your own t-clamps.

There are a lot of workholding options, so I recommend checking out our resources page for different options.

Touch Plate and Inductive Sensors

When starting your job, the LongMill needs to have a set origin point. You must choose a starting point for the machine to start from, and it will perform the movements sent by the computer from that point, in relation to the starting point.

The important thing is to setting the starting point. You can choose the starting point manually by just jogging the machine to the place you want to start and “Zeroing” the machine, but we’ve created the touch plate to help semi-automate the process.

We currently have a simple touch plate for around $30, and a more advanced AutoZero touch plate for around $100. 

Additionally, you can add limit or homing switches to your machine. These are sensors that are set up at specific corners of your machine so that you can return the machine to a specific position over and over again (Broll of homing). For the LongMill, when you shut off your machine, it does not remember the specific position relative to itself, and so by having a specific homing position to return to, you can use this to reference the positions of the machine automatically. For example, if you want to set up a job in the same position over and over again, you can home your machine and find the origin of the part relative to the home position after you’ve shut your machine off.

You can get an inductive sensor kit for about $50-60 dollars from our store, however, we generally recommend this to only advanced users, since the setup and process for using it can be complicated, and we generally recommend users who are already familiar with their CNC machines to use it.

Other Accessories

The LongMill also is compatible with other accessories, like the Vortex Rotary Axis and LaserBeam add-ons that provide additional functionality. Over the past few years, we’ve developed these add-ons to plug and play with the LongMill. We plan, over time, to continue to create new add-ons and accessories that help our customers do more things.

For a full list of other add-ons and accessories you can get with your LongMill make sure to check out our add-ons section in our store (https://sienci-upgrade.cospark.io/product-category/addons/mk2-addons/).

Maintenance Items

The LongMill requires some regular maintenance which is easy and straightforward to do. Recommended maintenance checks can be found in our resources.

There are only two consumable items, the Delrin Ant Backlash Blocks and Delrin V-Wheels which we recommend replacing every 1500-2000 hours, roughly once a year of regular use. Some customers choose to have them on hand just in case.

Conclusion

I hope this helps answer the “what should I get with my LongMill” question we get all of the time. If you have any other questions, please feel free to reach out!

Posted on

Videos You Might Have Missed Last Month (July 2023)

Hey everyone. Here are some informative videos that you might have missed last month. Check them out below and make sure to subscribe to our YouTube channel to keep up with our CNC-related videos.

Building a Guitar on a CNC Part 6: Assembly

Time to SHRED X6! Welcome to the exciting conclusion of our epic guitar journey! We are thrilled to showcase the delightful process of assembling an actual, fully-functional custom guitar, crafted with precision using our LongMill MK2 CNC.  

Making a Unique Tabletop Inlay on the LongMill MK2 CNC

Are you looking for a project that does not require a lot of programming? In this video, Dennis Harlock shows us how to easily take an oddly shaped piece of wood and turn it into a unique tabletop inlay using the LongMill.

The Cottage Country Sienci Series

We’re on the road, CNC in hand, headed to the lake to set up shop. We’re going to show you that you don’t need a big footprint or all kinds of fancy tools to create amazing projects on your CNC. Follow along as the Cottage Country Sienci series comes to life!

Building a Guitar on a CNC Part 5: Pickguard

Time to SHRED X5! In part 5 of our CNC guitar series, Scott walks us through making a custom pickguard on the LongMil to protect your guitar. Follow along as we provide you with all the files and more! 

Posted on

August 2023 Production Updates

July was a bit of a slow month due to the Vancover port strike holding up shipments for us to ship LongMills in the queue. However, now that parts are back to arriving again, we’re picking back up with our regular routine.

We have a lot of news to cover, especially with the pending release and shipping of the Vortex Rotary axis and new development around the SuperLongBoard.

Want to get news like this directly in your email inbox? Make sure to sign up for our mailing list.

UPS reaches labour deal with Teamsters before strike

This July, we found out that Teamsters working for UPS were preparing for a strike in August, which would have disrupted shipments going to the US. However, UPS and Teamsters have settled on a new UPS contract which increases worker wages across the board and improved working conditions.

We are happy to hear that a resolution has been made, especially as we get into the busiest part of the season for our business.

LongMill and Extension Kit Orders

July has been a slow month for us shipping out LongMills as we have been affected by the port strike that delayed our shipment of controller boards. However, I’m happy to announce that we will receive the boards today and expect to clear the queue in the next 2 weeks.

The large majority of the pending 100 LongMill orders have been packed and are waiting to have the controller boxes done to have them shipped out.

Some LongMills waiting to be shipped

As some folks may know, we’ve continued to work on smoothing out the process of dealing with customs for shipments going to the US. Recently, we’ve been assigned a single contact with UPS to handle all of our LongMill shipments that need customs clearance going to the US. We found that some items were being miscategorized for duties and taxes, and we suspect it is because a big part of this is a manual process that causes human error. We believe that having a single contact who is familiar with the line items will speed up the clearance process with fewer mistakes.

A few new design updates on the LongMill MK2 design include a focus on phasing out of using M3 bolts in the assembly process and replacing them with M5 screws, including parts such as the couplers and ACME locking nuts. We are phasing out components using M3 screws in the LongMill assembly process because they are prone to stripping the heads more easily. Eventually, a full LongMill will be able to be assembled with just one M5 Allen key and our special wrench that we provide (as well as a drill and bit to mount your LongMill to a wasteboard of course).

Some new prototypes of the assembly wrench for new hardware
New T8 locking nuts replacing the brass ACME nuts

We are also starting to use longer Z motor cables for the motors so that LongMill 48×30 kits, which are now the most popular variant, will not need a motor extension cable, simplifying the assembly process as well.

Additionally, now that the design of the LongMill MK2 has matured over the past year or so since its launch, we are moving to figure out injection molding parts for it for the first time. If you didn’t know, we 3D print several components for the LongMill MK2, including the dust shoe and feet. We found that due to the large number of feet we print, moving to injection molding would be a natural next step to reduce our need to rely on the 3D print farm, which is harder to scale production for.

We are entering into the first day of August with around 100 pending LongMill orders, but we expect to clear the queue in a week or two, after which we expect to shorten lead times again.

Vortex Rotary Axis

The last of the Vortex Rotary Axis parts have arrived at the end of July and we are now starting production and assembly!

First batch of machined parts looking beautiful
Test assembly of the Vortex kit
Switch assemblies for Y axis to rotary mode

Our team has been continuing to work on different areas of the Vortex so that when they get into the hands of our users, they’ll have everything they need to get started. This includes:

  • Thorough assembly and installation instructions. We just completed initial trials and tests of the assembly process to make sure that we provide clear instructions to make it easy to put together. We found that everything came together really easily, except for the cam clamping system for the t-track, which we are currently working on to make it less finicky. We estimate that most users should be able to put it together in about 30 minutes. Full instructions will be found on our Vortex Resources soon.
  • Video content about the Vortex. We understand that not a lot of how-to and tutorial content exists for rotary CNCing. Our video production team and the engineers are working on the next steps for creating content so that our users can learn how the Vortex works and how to use it.
  • The gSender team continues to work on completing Rotary Axis implementation into the gSender, including homing and visualization for rotary. These features will be in gSender Edge at the time of launch and will be merged into the main version of gSender down the line. You try and learn about the latest version of Edge here.

We will start to trickle out Vortex Rotary Axis kits over the next week or two as we iron out the last bits of details. We expect the first batch of kits to start shipping out at the end of this week or early next week.

LaserBeam

LaserBeam production continues to move along smoothly, with most orders shipping out within a few days. We have stock available for the LaserBeam ready to ship now.

SuperLongBoard

Work for the SuperLongBoard (SLB) continues on. The team has been able to successfully test the main functionality with excellent results. However, we found our initial tests with the onboard compute module to be unsuccessful, as the Broadcom and Rockwell-based processors used on smaller compute modules to not be powerful enough to accommodate the visualization of g-code directly onboard.

Revised SLB

While additional software development was able to make significant speed improvements, we felt that the compute module would most likely need more headroom in the future if we were to implement other features down the line such as having a camera monitoring system, which we felt would be difficult to add due to a limitation of system resources.

We have now started looking at higher power compute modules, single board computers, and other hardware that we feel would ensure that the onboard gSender experience would be smooth and seamless, as well as provide headroom for future applications. However, the downside is that higher-power computers also cost more, and while our initial budget was around $80CAD/60USD for the compute module, we expect the computers to cost somewhere around $100-$200USD depending on the specs and configuration.

That being said, since we don’t need to have certain components and other parts to support the onboard computer directly, some of the cost of the computer is offset by the lower cost of the SLB itself.

We’ve decided to split the development of the SLB into two parts, one for the board itself, which will use grblHAL, a new, more advanced firmware and all of the improved motor control and drivers, and the computer itself. This means that the computer will live off the board in one fashion or the other.

While it would have been really cool to have the whole system integrated, we believe that by dividing and conquering, we can have the main portion of the SuperLongBoard out of the development process and into production first, and focus on the computer addition after. We felt like we could tackle some of the main problems with the current LongBoard with the new controller, and that it would be better to have the improvements we’ve already developed reach users sooner rather than having everything wait on further development on the onboard computer side.

This means that users will still need to connect their computers to the board to control their machines when the first batch of SLBs release, but better communication protocols, electronics, and shielding will make the USB connection significantly more reliable than before. Andrew, our main developer on this project, assures me that unreliable connections that cause issues with some users with the current board will be a thing of the past.

This version of the SLB natively supports communication over Ethernet, as well will have onboard storage which allows for streaming onboard rather than through a cable, which will improve reliability as well.

We are making the final design changes to prepare this version of the SLB for prototype production, and we hope to have production boards available near the end of the year. If you want to learn more about the SLB, please read: https://sienci-upgrade.cospark.io/2023/04/10/first-look-at-the-superlongboard/

Posted on

July 28 – August 4, 2023 “Your Most Difficult Project” Contest

So many photo art projects! Thank you to the makers who participated in this week’s contest, where we asked you all to post your photo art carvings made on your LongMill.


Last Week’s Winners

We are happy to announce that Vince Iannotta, Homestead Acres, John Hitcher, Lance Wilkins, Mark Eisenlohr, and Nelson Joseph are the winners of the “A Project That is Photo Art” contest! Watch out for a prize!


This Week’s Theme: Your Most Difficult Project

For this week’s contest, we want you to post what you think was the most difficult project that you made on your LongMill. Share them with us for a chance to be one of the winners of this week’s contest and win free prizes! Bonus points if you tell us why it was the most complicated one for you.

Have ideas for themes? Let us know by commenting down below!

Happy making!